I really had to struggle a lot to properly configure Openswan on my Red Hat Linux machine so that I can connect to my Sonicwall firewall. Well for others I will leave the steps and will also provide the links of different pages where you can look for a solution for any error they get on your way.
These are the configuration to be done on Sonicwall level
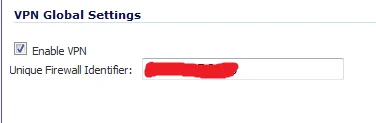
Firstly, make sure that the VPN is enabled, and that your SonicWALL has a unique identifier. You can leave it at the default.
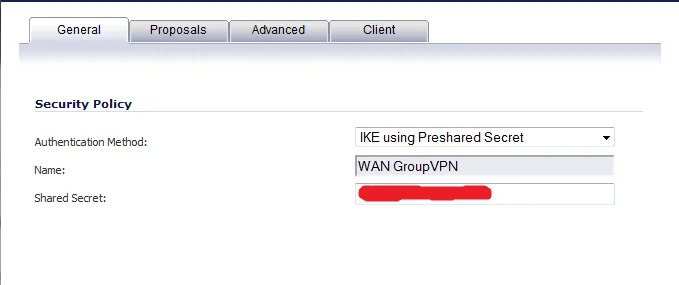
Next, create a GroupVPN policy. We’re using XAUTH for authorization so you would need to add some local users afterwards. On the first screen, define the policy authentication method, and the shared secret:
Now define your proposals. Use Diffie-Hellman Group 5, encryption 3DES, authentication SHA1 with 28800 lifetime. For the second phase, use ESP protocol with 3DES encryption and SHA1 authentication. Enable Perfect Forward Secrecy.
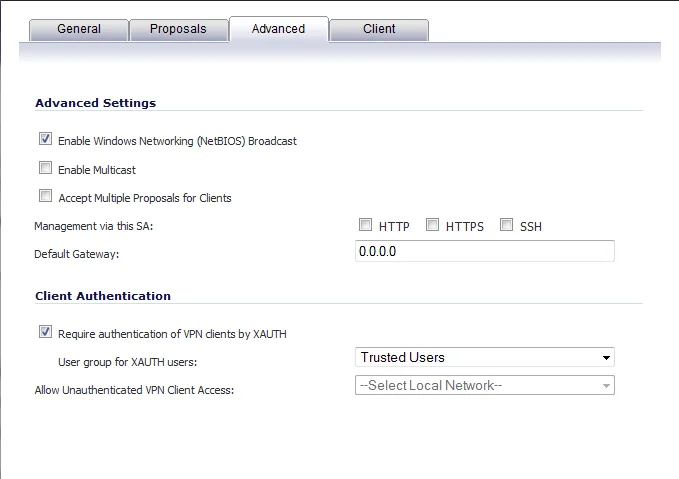
On the Advanced screen, click to enable XAUTH. We’re using a custom group called Trusted Users.
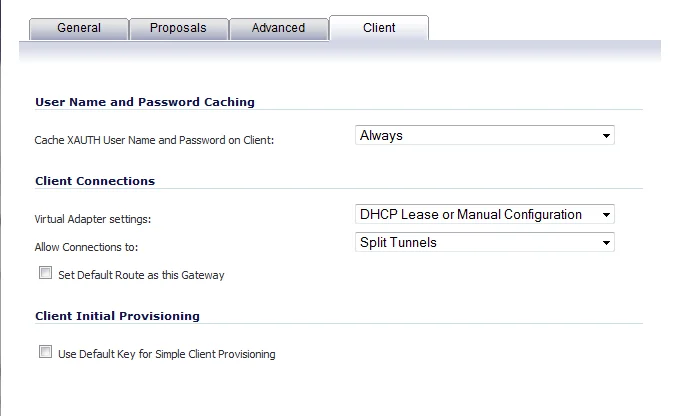
Finally, on the Client tab, uncheck all the boxes and make sure that the Virtual Adapter Settings are set to “DHCP Lease or Manual Configuration”. If you are not going to be using any Windows clients with this connection, then you can set this to “None”. This option gives the ability to use any client, though.
Now click OK to apply all of these settings.
On the Red Hat 5 Linux box
Make sure you have openswan package installed on your machine. You can download the latest version from their official website
or you can use yum to install this package.
NOTE: If you are downloading the package from openswan and manually compiling it then the steps of configuration would be different as I am showing the steps you can use if you install a rpm file of openswan.
# yum -y install openswan
Now this is my ipsec.conf file
IMPORTANT NOTE : Make sure that all the parameters are written after a TAB except ‘version’, 'conn' and 'config' or else you might get an error.
# vi /etc/ipsec.conf
version 2.0     # conforms to second version of ipsec.conf specification

# basic configuration
config setup
# Debug-logging controls:  "none" for (almost) none, "all" for lots.
# klipsdebug=none
# plutodebug="control parsing"
# For Red Hat Enterprise Linux and Fedora, leave protostack=netkey
   protostack=netkey
   nat_traversal=yes
   interfaces=%defaultroute
   oe=off
# Enable this if you see "failed to find any available worker"
   nhelpers=0

 #You may put your configuration (.conf) file in the "/etc/ipsec.d/" and uncomment this.

conn sonicwall
    type=tunnel
    left=10.10.10.134              # Your local linux machine IP
    leftsubnet=10.10.10.0/24       # The subnet of your local Linux machine
    leftid=@GroupVPN               # Same as given in Sonicwall
    leftxauthclient=yes
    right=xxx.xxx.xxx.xxx          # Sonicwall VPN IP
    rightsubnet=192.168.0.0/24     # Sonicwall LAN subnet
    rightid=@xxxxxxxxxxx           # Sonicwall Unique Identifier
    rightxauthserver=yes
    keyingtries=0
    pfs=yes
    auto=add
    auth=esp
    esp=3DES-SHA1                  # protocol used for authentication in sonicwall
    ike=3DES-SHA1
    authby=secret
    aggrmode=yes
NOTE: Make sure that leftid and rightid are starting by @ sign where leftid is the name given to the VPN in Sonicwall and right id is the Sonicwall Unique Identifier.
You can use any conn name for this example as in my case I have used sonicwall.
Now once you are done with the configuration file you will have to generate host key for the same.
# ipsec newhostkey --output /etc/ipsec.secrets --bits 2048 --verbose --configdir /etc/pki/nssdb/
Once the key is generated in your ipsec.secrets file, open it and add the following line
# vi /etc/ipsec.secrets
: RSA {
: RSA {
: RSA {

# RSA 2048 bits ip-10-0-0-134 Tue Oct 9 10:32:09 2012
# for signatures only, UNSAFE FOR ENCRYPTION

#pubkey=0sAQOtfFcvEQ6QJvVrr0DEFCa9ImnGLwOWXkTVsNJUptu8GRDLmD5otOiwiQG7LGs7fDsKoLUKhnMskixtwoSgNzBAk8tfyZGUCxK/q2nvJ+QN67SG1Xlh3SG3c/FaVPRmS7WYKYCO942iZrZuao/sj+NuJWr0nL8zkEO0KVX5FId8vnmmOak8vwDeGQ0K2g1zgMRIrj1jYSahe/tSr6bMnCvYFkXiKHn50zjyfktGnChsJNcRtgj2R4RUcK6ahtXfYRRMCCzITuSKy2eG+yPQ/vOuaTOqkiKp9FmkF0UZDDE/GjK65zwe2JEVRtmvDX/tzR7Lsgfk5mcCdGWsnIR499XL

Modulus: 0xad7c572f110e9026f56baf40c41426bd2269c62f03965e44d5b0d254a6dbbc1910cb983e68b4e8b08901bb2c6b3b7c3b0aa0b50a86732c922c6dc284a037304093cb5fc991940b12bfab69ef27e40debb486d57961dd21b773f15a54f4664bb59829808ef78da266b66e6a8fec8fe36e256af49cbf339043b42955f914877cbe79a639a93cbf00de190d0ada0d7380c448ae3d636126a17bfb52afa6cc9c2bd81645e22879f9d338f27e4b469c286c24d711b608f647845470ae9a86d5df61144c082cc84ee48acb6786fb23d0fef3ae6933aa9222a9f459a41745190c313f1a32bae73c1ed8911546d9af0d7fedcd1ecbb207e4e667027465ac9c8478f7d5cb

PublicExponent: 0x03
# everything after this point is CKA_ID in hex format when using NSS
PrivateExponent: 0xf0ece7ac58e0dcae7aa3638a98cfa1f132c152f4
Prime1: 0xf0ece7ac58e0dcae7aa3638a98cfa1f132c152f4
Prime2: 0xf0ece7ac58e0dcae7aa3638a98cfa1f132c152f4
Exponent1: 0xf0ece7ac58e0dcae7aa3638a98cfa1f132c152f4
Exponent2: 0xf0ece7ac58e0dcae7aa3638a98cfa1f132c152f4
Coefficient: 0xf0ece7ac58e0dcae7aa3638a98cfa1f132c152f4
CKAIDNSS: 0xf0ece7ac58e0dcae7aa3638a98cfa1f132c152f4
}
# do not change the indenting of that "}"
@GroupVPN @xxxxxxxxxxx : PSK "Pre Shared Key"
Do not make any change in the RSA section just add a line at the end of the file
Write the Unique Identifier for sonicwall at the "xxxxx" sign and mention the pre shared key of sonicwall after PSK inside inverted commas.
Now you have to make some changes in your /etc/sysctl.conf file. Add these at the end of the file.
net.ipv4.conf.default.send_redirects=0
net.ipv4.conf.all.send_redirects=0
net.ipv4.conf.eth0.send_redirects=0
net.ipv4.conf.lo.send_redirects=0
net.ipv4.conf.default.accept_redirects=0
net.ipv4.conf.all.accept_redirects=0
net.ipv4.conf.eth0.accept_redirects=0
net.ipv4.conf.lo.accept_redirects=0
Usually using openswan, involves some kind of routing as well, that’s why net.ipv4.ip_forward default value 0 should be changed to 1 under the same "/etc/sysctl.conf "
file.net.ipv4.ip_forward = 1
Reload your sysctl.conf file
# sysctl -p
# sysctl -a
Once you are done with this you can start the services of ipsec
# service ipsec start
or
# ipsec setup --start
ipsec_setup: Starting Openswan IPsec U2.6.32/K2.6.18-238.9.1.el5xen...
ipsec_setup: /usr/libexec/ipsec/addconn Non-fips mode set in /proc/sys/crypto/fips_enabled
Once it is started verify your ipsec.conf file for any errors
# ipsec verify
Checking your system to see if IPsec got installed and started correctly:
Version check and ipsec on-path                                 [OK]
Linux Openswan U2.6.32/K2.6.18-238.9.1.el5xen (netkey)
Checking for IPsec support in kernel                            [OK]
SAref kernel support                                            [N/A]
NETKEY:  Testing for disabled ICMP send_redirects               [OK]
NETKEY detected, testing for disabled ICMP accept_redirects     [OK]
Checking that pluto is running                                  [OK]
Pluto listening for IKE on udp 500                              [OK]
Pluto listening for NAT-T on udp 4500                           [OK]
Two or more interfaces found, checking IP forwarding            [OK]
Checking NAT and MASQUERADEing                                  [OK]
Checking for 'ip' command                                       [OK]
Checking /bin/sh is not /bin/dash                               [OK]
Checking for 'iptables' command                                 [OK]
Opportunistic Encryption Support                                [DISABLED]
NOTE: Everything seems all right but if you are getting any error in the above then you can leave a comment
Time to start your VPN
# ipsec auto --add sonicwall
# ipsec whack --isten
# ipsec whack --name sonicwall --initiate
002 "sonicwall" #1: initiating Aggressive Mode #1, connection "sonicwall"
004 "sonicwall" #1: STATE_AGGR_I2: sent AI2, ISAKMP SA established {auth=OAKLEY_PRESHARED_KEY cipher=oakley_3des_cbc_192 prf=oakley_sha group=modp1536}
041 "sonicwall" #1: sonicwall prompt for Username:
Enter username:   user1
040 "sonicwall" #1: sonicwall prompt for Password:
Enter passphrase:
117 "sonicwall" #2: STATE_QUICK_I1: initiate
002 "sonicwall" #2: transition from state STATE_QUICK_I1 to state STATE_QUICK_I2
004 "sonicwall" #2: STATE_QUICK_I2: sent QI2, IPsec SA established tunnel mode {ESP=>0xb5803bdf <0x4038b6db xfrm=3DES_0-HMAC_SHA1 NATOA=none NATD=none DPD=none}
So now you are successfully connected to your vpn as you can check if you are able to ping you VPN local LAN as mentioned in your ipsec.conf file.
Other related commands
If you make any changes to config file after restarting
# ipsec auto --replace sonicwall
Follow the below links for more tutorials
What is the difference/comparison between Unix and Linux ?
What are the maximum and minimum limits for RHEL 4 vs 5 vs 6 ?
Step by Step Linux Boot Process Explained In Detail
What is the difference between ext3 and ext4 filesystem in Linux ?
How to configure Private Network in VMware Workstation
9 examples to help you understand top command usage in Unix/Linux
Configure Red Hat Cluster using VMware, Quorum Disk, GFS2, Openfiler
Tutorial for Monitoring Tools SAR and KSAR with examples in Linux
15 tips to enhance security of your Linux machine
Understanding Load Average in Linux and when to be worried about it?
Disk Attachment Technology FC vs SAS vs iSCSI
Understanding UMASK value in Linux
How to keep a track of all the commands run by any user in Linux
How do you check Linux machine is Physical or Virtual remotely?
RAID levels 0, 1, 2, 3, 4, 5, 6, 0+1, 1+0 features explained in detail